Resources
For students

Golden Bread

Explore the science, engineering, and bioethics of a yeast that's genetically modified to make a vitamin-enriched food

OBJECTIVES

By the conclusion of this laboratory investigation, you should be able to:

  • Define and properly use synthetic biology terms: chassis, system, device, redundancy.
  • Define and properly use molecular genetics terms: PCR, gene expression, codon shuffling, complementation.
  • Explain the role of redundancy in engineering.
  • Explain how microbes can be used to make useful chemicals to meet human needs.
  • Culture yeast using proper microbiology methods.
  • Measure the genetic variations in a yeast population:
  • Define and properly use synthetic biology terms:
  • Define and properly use molecular genetics terms:

INTRODUCTION

Nature makes it look easy! Using just a few kinds of atoms, nature builds chemicals that can do all sorts of things. Even within the small collection of BioBuilder activities, you can find biologically built molecules that smell like bananas, that cut other molecules in two and that turn bacterial cells purple or green. In the experiment described here, nature’s talents as a chemist are applied to making beta-carotene, which is processed in the body into Vitamin A. Many kinds of plants and fungi make beta-carotene naturally, but animals can’t make their own from scratch. In countries where access to fresh vegetables is limited, Vitamin A deficiency is common, and in severe cases it can lead to blindness. The World Health Organization estimated that over 200 million school age children suffer from Vitamin A deficiency.

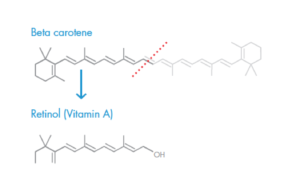
Chemical structures of beta-carotene and vitamin A

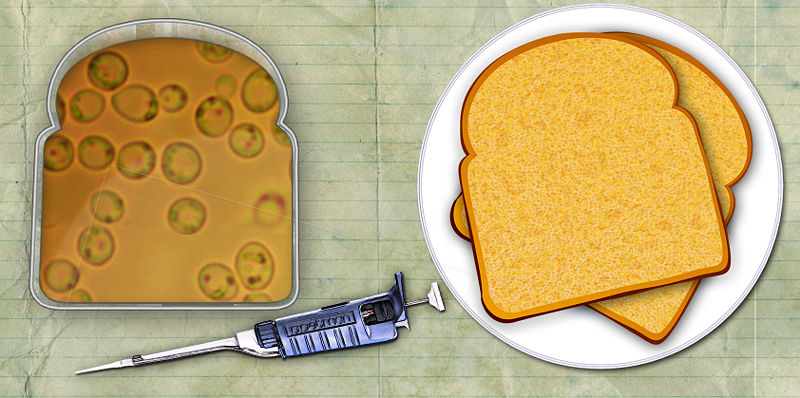
The Science and Engineering of Golden Bread

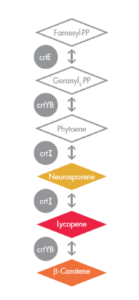
A pathway for synthesizing beta-carotene

The 2011 iGEM team from Johns Hopkins University engineered Saccharomyces cerevisiae to produce beta-carotene. This species of yeast is commonly used as a model organism in the lab as well as in bread making and brewing.  The iGEM team hoped the modified yeast could be used to make nutrient-enriched loaves of “golden bread.”

Scientists had engineered Saccharomyces cerevisiae to express three genes (crtE, crtYB, and crtI) from a naturally red fungi, Xyanthophylomyces dendrorhous (the reference is linked here). The genes encode enzymes that convert a naturally produced chemical, farnesyl diphosphate, into beta-carotene. The metabolic pathway is shown in the figure on the left. The first three compounds in this pathway are colorless, and the last three are colored yellow, red, and orange, respectively. The enzymes that catalyze the reactions are shown as grey circles. Interestingly, the first reaction can be catalyzed by the enzyme crtE from the red fungus, X. dendrorhous or by the enzyme BTS1 (not shown) that is made naturally in baker’s yeast. The other two enzymes, crtYB and crtI, have no homologs in baker’s yeast and so had to be imported from X. dendrorhous, to carry out the rest of the steps in the biosynthesis of beta-carotene.

Some of the modified yeast were bright orange — a good indication that they were making beta-carotene. However, while the strain produced orange colored colonies most of the time, white, yellow and red colored colonies were also produced.


If you’d like to try to understand what’s causing the instability, jump to the “Science of Golden Bread” section.

If you’d like to try to fix this instability and engineer a strain that can make beta-carotene more reliably, then jump to the “Engineering of Golden Bread” section.

If you’d like to consider the societal implications of food engineering, then jump to the “Food for Thought” section.

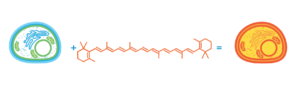
Idea for modified baker’s yeast

Procedure

THE SCIENCE OF GOLDEN BREAD

About your experiment

We don’t know why the beta-carotene producing yeast strain gives colonies of different colors. Perhaps some of the genes needed for vitamin production are no longer present. The strain we started with was modified with three new genes (crtYB, crtI and crtE).

In the first part of this experiment, you’ll work the way Mendel did as he looked for patterns in the variations among offspring from a single kind of organism. He counted round or wrinkly peas, while you’ll count orange and non-orange yeast colonies. You will add a redundant copy of one of the genes in the pathway, and in a few days you’ll have data to look at. Can the extra copy “rescue” the phenotype and build a more stable engineered product?

In the second part of this experiment, you will work the way Mendel might have if he’d had the tools of molecular genetics at his disposal. You can look for the presence of the crtYB, crtI and crtE  genes using the polymerase chain reaction (“PCR”). For reasons described in the “The Engineering of Golden Bread” section, you will start by looking for variations in crtYB.

CHARACTERIZING THE GENETIC VARIABILITY

Restreaking Yeast for Single Colonies

A video showing you how to restreak cells is here:

Restreaking Strains


    1. Label your petri dish with your initials, today’s date, the kind of media in the petri dish (YPD) and the strain that you’ll be restreaking onto it.
    2. Start by dabbing the flat end of a toothpick onto a colony of yeast that you want to restreak. The colony should be well isolated from the others and uniform in appearance.
    3. Transfer the cells from that toothpick by lightly touch the toothpick to a spot on the new petri dish that you’d like to grow. Note: you should not break the surface of the agar with any of this procedure, but the results will still be OK, even if you do.
    4. With the flat end of a new toothpick, spread out the cells in the dab you made on the new petri dish by drawing your toothpick back and forth through the dab and then along the media in the dish. Do not back up as you draw since you are trying to spread out the cells that are on the toothpick from your one pass through the original dab of cells.
    5. With a new toothpick, spread out the cells still further, drawing from the ending line you made with the second toothpick. Again, do not back up as you draw with this third toothpick and try not to break the surface of the media.
    6. Replace the lid of the petri dish and incubate the plate media-side UP in an incubator (room temp or 30° for 2 days).
    7. When you’re back to examine the cells, make sure you not only notice variations in the number of colonies and how they are growing on the plate, but also the color of the colonies and how many of each type you see. If you’d like to explore the questions of stability further you can ask if a colony of one color always stays that color (e.g. if you restreaked a red colony, does it always give rise to red colonies or are there orange, yellow and white colonies as well). You could also ask if there are experimental conditions that affect the variation you see.
DEFINING THE GENETIC VARIATIONS BY PCR

PCR requires only a few materials

      • a DNA template to copy (in this case the DNA will come from the yeast),
      • a pair of short DNA primers to define the edges of the DNA copies,
      • reaction mix that provides the needed buffers, enzymes and nucleotides,
      • and a thermal cycler to vary the reaction temperatures.

The primers are bases on the sequence of Part:BBa_K530000 the version of the crtYB gene that was deposited in the Registry of Standard Biological Parts. A sequence file for this gene is here. The gene came from the Xanthophyllomyces dendrorhousmRNA sequence of crtYB that is here. Based on these links, what is the length of the crtYB product you are expecting from the PCR experiments?

Before you begin, think through the results you might see:

You can expect no PCR product if you try to amplify crtYB from a strain that lacks the crtYB gene. Since a negative result could mean that the reactions themselves were not set up properly, we’ll have to include a positive control and amplify crtYB from some plasmid DNA in a second reaction. You might also expect that the strains with different colors may also have different amplification patterns. So you’ll also want to amplify colonies of different colors to look for different amounts of PCR product and how that might related to the colony colors. Finally, can you anticipate any of the results? Perhaps you can make sketch of the agarose gel results you’ll expect in advance of trying the experiment. That way you can more easily compare what you actually discover to what you predicted at the outset.

  1. Move an PCR EdvoBead to tube that fits in your PCR machine
  2. Thaw the two primers:
    • NO302 = crtYB-ORF-F
      • 5′- ATG ACG GCT CTC GCA TAT TAC CAG ATC CAT CTG ATC TAT ACT CTC CC -3′
    • NO303 = crtYB-ORF-R
      • 5′- TTA CTG CCC TTC CCA TCC GCT CAT GAC CAC ACT CAA GAC TTT CCG TAC -3′
  3. Prepare lysate: scoop a small colony you’d like to study into 50 ul H2O and microwave for 15 seconds with the lid of the eppendorf closed. Prepare a lysate for any yeast you’d like to study.
  4. To the bead that’s in the PCR tube add
    • 20 ul H2O and then vortex the sample
    • 1 ul of each primer
    • 2 ul of lysed yeast cells or + control DNA that carries crtYB on a plasmid
  5. PCR cycle:
    • 95° 2 minutes
    • 95° 20 seconds
    • 50° 20 seconds
    • 72° 2.5 minutes
    • repeat steps 2-4 a total of 35X
    • 72° 10 minutes
    • 4° hold
  6. Add 5 ul loading dye to each sample
  7. Run 25 ul on a 1% TAE gel with a stain to visualize the bands (Ethidium Bromide or CyberSafe). The gel could run for 20 minutes at 120V. Be sure to load a molecular weight marker on the gel with bands that range from 1 kb to 5 or 8 kb.

THE ENGINEERING OF GOLDEN BREAD

About your experiment

A person who’s really worried about his pants falling down could choose to wear both a belt and suspenders. This redundancy might seems silly, but for system engineers, redundancy is a commonly used strategy for making systems more robust. Having more than one version of a component can avoid some catastrophic failures in a system. For example, car manufacturers still choose to install seat belts in their cars even after they started using air bags. In biology, cells use redundancy too. Most cells are diploid since having two copies of a genome makes the cells less prone to suffer (i.e. die!) from a deleterious mutation they acquire.

Applying this idea to the beta-carotene producing yeast system: one way to improve the reliability of this system would be to engineer a redundant copy of a component that’s prone to failure. In the experiment here, we’ve chosen to focus on crtYB since it’s the one gene in the synthetic pathway that was added in single copy. But you could use the same strategy for any of the system’s components. No matter what gene you choose, though, you don’t want to make more problems for the cell and make matters worse. Here’s one potential problem you can anticipate: You know from your study of mitosis in intro biology class, if you introduce an absolutely identical copy of that gene, then it’s likely to undergo recombination with its copy and that would delete the gene. We can help the cell avoid this problem by codon shuffling the duplicate copy, as described in part 1, below. Once the redundant gene’s been designed, you’ll use a yeast transformation protocol to add the redundant gene to the beta-carotene producing yeast system to see if it can reduce some of the color variations that the existing system is prone to.

DESIGNING A REDUNDANT GENE

With the steps outlined below, you’ll see how to recode the crtYB gene using degeneracies in the standard genetic code. With conservative substitutions, the amino acid code is kept the same but the DNA sequence has been changed enough to inhibit homologous recombination with the starting copy of crtYB — at least that’s the hope! To distinguish the two versions of the gene, we can call the new copy ” crtYB’ ” with the “prime” indicating a codon shuffled version of the original sequence.

If you’d like to see what we did, start by importing [[Media:CrtYB K530000.ape| the existing sequence file for crtYB]] into a plasmid editing tool such as Ape.

  1. Import the primer sequences into new Ape (or other DNA plasmid) files.
    • NO302 = crtYB-ORF-F: 5′- ATG ACG GCT CTC GCA TAT TAC CAG ATC CAT CTG ATC TAT ACT CTC CC -3′
    • NO303 = crtYB-ORF-R: 5′- TTA CTG CCC TTC CCA TCC GCT CAT GAC CAC ACT CAA GAC TTT CCG TAC -3′
  2. Align the primers to the crtYB sequences (this is done by selecting the “align sequences” option from the drop down menu in ApE). We wanted to keep these sequences identical to the original sequence so we could amplify the new copy of the crtYB gene with the same primer pair.
  3. We decide to make your new copy of crtYB into a standard biological part so it might be entered into the Registry of Standard Biological Parts. To make it a standard part, we identified which restriction sites are NOT permitted in the new sequence. Here is a video tutorial for how to do this with DNA2.0’s software, if you’d like to try it yourself.
  4. We next sent a note to the gene design experts at a company called “DNA 2.0″ that said: *””Please codon randomize this sequence after bp 47 and until bp 1975. We want there to be no sequences for EcoRI, PstI, SpeI, XbaI restriction sites. We’d like the final gent to be controlled with a constitutive yeast promoter and cloned into the vector, pRS414.””
  5. After some back and forth and some further refinements, the crtYB’ DNA arrived in the mail about 4 weeks after the initial request was made. The sequence of the crtYB’ gene is linked [[Media:CrtYB’.ape| here.]] Using the programs below from NCBI and NEB we double checked that the DNA was, in fact, different but the amino acid sequence was, in fact, identical. We further checked that the restriction enzyme recognition sites that we wanted excluded from the sequence were really missing.
TRANSFORMING YEAST

S. cerevisiae does not naturally uptake new DNA from its environment but can be made competent by chemical treatment. These instructions are written for a kit sold by Q-biogene to prepare competent cells. The contents of the kit are proprietary but the protocol seems most like ones for chemically competent cells

Unlike transformations that you might be familiar with using bacteria, yeast that have been transformed are selected for using “drop out” media. In our case, the Vitamin A producing yeast also have a defect in a gene for tryptophan biosynthesis. If we grow the yeast on “rich” media, like YPD, there is enough tryptophan provided by the media for the cells to grow. If we grow the yeast on media that lacks tryptophan (called “SC-trp,” where SC stands for synthetic complete), then the Vitamin A producing yeast will not live. Finally, if we transform our yeast with a plasmid like pRS414 or a [[Media:PRS414 crtYB’ PlasmidMap.pdf| version of pRS414 that also carries the crtYB’ gene,]] then cells with the plasmid will grow and we can test them for Vitamin A production.

  1. For each transformation you want to perform (positive control, negative control, experimental), begin by swirling a toothpick full of Vitamin A producing yeast into 500 ul of water in an eppendorf tube.
  2. Harvest the yeast by spinning the eppendorf for 30 seconds in a microfuge.
  3. Remove the supernatant from each pellet by aspirating or pipeting it away into a waste beaker with some 10% bleach in it. You do not have to remove every drop of the supernatant.
  4. Wash each pellet of cells by resuspending them 500 ul of “wash solution” (most likely just sterile water!) from the kit.
  5. Harvest the cells in a microfuge, spinning 30 seconds at full speed.
  6. Aspirate or remove the supernatant as before.
  7. Resuspend each pellet in 50 ul of “competent solution” (most likely lithium acetate and DTT which permeabilizes the yeast through an unknown mechanism). Unlike chemically competent bacteria, competent yeast are not “fragile” in this state and can remain at room temperature.
  8. Add 5 ul of just water one eppendorf and label the top appropriately. This should serve as your “no DNA,” negative control. Flick the tube to mix the contents.
  9. Add 5 ul of pRS414 DNA (50 ng) to another eppendorf and label appropriately. This plasmid bears a yeast origin of replication and a TRP1 gene and will serve as a positive control for transformation.
  10. Add 5 ul of your pRS414+crtYB’ DNA (50 ng) to another eppendorf and label appropriately. This is your experimental sample.
  11. To each tube add 500 ul “transformation solution” to your cells. This material, most likely polyethylene glycol (“PEG” aka antifreeze) is thick and goopy and is included in transformation protocols to help deliver the DNA into the yeast. Use your P1000 to pipet the yeast and the “transformation solution” and vortex the tube to make an even suspension.
  12. Incubate the tubes at 30° for approximately one hour, along with the needed number of SC-trp petri dishes, with their lids ajar if there is moisture on their surface. During this hour you can periodically “flick” your tubes to mix the contents, this will help keep the cells from settling to the bottom.
  13. After at least an hour (longer is OK too), flick the tubes to mix the contents and then spread 250 ul of each mixture on your SC-trp dishes.
  14. Incubate your petri dishes, media-side up, at room temp or in a 30° incubator for 2 days.
  15. After you return to collect your data, determine the number and color of colonies on each dish. You can undertake the same analysis that you did in Part1 for the starting strain but will have to grow your colonies on SC-trp instead of YPD to maintain the plasmid in the yeast.

FOOD FOR THOUGHT: DISCUSSING BIOETHICS

Should we engineer food?

THE GMO DEBATE
  • [[Media:Alex B. Berezow- Embracing the Promise of GMOs – WSJ.pdf| WSJ article on GMOs]]
  • [[Media:CowTippingPoint.pdf| Public benefits to Science as UN Declaration of Human Rights]]
  • plant genetic manipulation
  • Golden Rice
WHO DECIDES?
  • Regulatory bodies: FDA, EPA, USDA
  • Funding for research: NIH, NSF, private foundations
  • Testing for safety and efficacy: clinical trials, peer review

The business of bioengineering

A handful of genes, a cup of flour and voila — Golden Bread®! Sounds like a million dollar idea, and one that could help address world hunger. But not so fast: what does it really take to bring this clever food product to market. Could a successful company be built around this technology?

Imagine you’ve just pitched this idea for a nutritionally-enhanced bread to a venture capital firm and a panel of angel investors. These are groups or individuals who invest their money in early stage initiatives, with expectations that they’ll make many times their investment in returns. These investors are looking for the next “Facebook.” Happily, they thought that genetically engineered yeast capable of baking vitamins into bread was an attractive idea. They were impressed by the fluffy and bright orange loaves of bread you brought. They looked yummy, even with a hearty dose of beta-carotene. They’d like you to compete with other biotech groups for next month’s round of $100,000 seed funding, but there’s a lot of work to do if you’re going to make a successful company from this synthetic organism.

Here are some starter ideas for your work on this aspect of the module. Perhaps as a class you’ll work through these or perhaps they’ll be assigned as a project or report. Either way, if you have ideas to share, there are places on the BioBuilder website to do that!

HOW TO MAKE $: BUSINESS MODELS
  • Cost/benefit analysis
  • Lowering costs
HOW TO MARKET?
  • Logo design

Considering alternative strategies

As a thought exercise, research and then consider how you might implement a “kill switch” as a way to keep the Vitamin A producing yeast stable.

  • What other explanations could there be for the unstable phenotype?
  • What could you modify the genes we have, by changing the promoter for instance, and in that way increase stability?
  • Are organisms other than Xanthophyllomyces that have genes we could use to make our golden bread? Maybe those genes would express more reliably
  • Add your questions and ideas here!

Lab Report

I. INTRODUCTION
  • Provide a brief introduction describing the field of synthetic biology.
    • What is it? How does it work? How might it be useful?
  • Briefly describe the purpose of the lab.
    • What are we trying to do here? Presume that a reader of your lab report has not read the assignment.
  • If, with your experiments, you asked engineering questions, then you might address
    • What is the role of the redundancy?
    • How does redundancy affect the expression of a genetic system?
    • How might synthetic biologists use redundancy?
    • Why is it important to engineer a stable system?
    • What are the advantages/concerns of engineering redundancy into a system?
    • How can you know if redundancy has improved the synthetic system you’re studying?
II. METHODS
  • You do not have to rewrite the procedure.
  • Explain why you did each step of the protocol.
III. RESULTS
  • Present the data in tables in clear format, i.e. with title and caption.
  • Present a figure (complete with labels and legend) images of data if you’ve taken photos of the petri dishes or the agarose gel.
  • Describe the results, but try not to interpret what they mean (that’s for the discussion section!)
    • Describe the appearance of the gel and the petri plates.
    • Are the bands what you expected?
    • What about the colors of the colonies?
IV. DISCUSSION
  • Draw your conclusions from the data
    • Do the colonies turn colors for reasons you can explain, based on the data?
    • Can you make beta-carotene production more reliable?
  • Analyze the data itself
    • Be sure to discuss how each part of the experiment and results adds to your conclusion.
    • How can you know that the experiments you performed worked?
    • What do the controls tell you or make you wish you’d done differently?
    • Discuss errors and other reasons for data variability.
    • Use your results to consider how synthetic biologists might engineer more reliable system performance into the synthetic cells they are programming